




How to Fix Loose Sneakers: 7 Solutions That Work
Table of Contents
- Why Your Sneakers Feel Loose (and What You Can Do)
- Quick Fixes to Tighten Loose Sneakers
- How to Stop Heel Slippage with Grips and Pads
- Best Insoles for Loose Shoes
- No-Tie Elastic Shoelaces: A Permanent Fix for Loose Sneakers
- Material-Specific Fixes: Leather vs. Mesh vs. Canvas
- DIY vs. Professional Repair: When to Seek Help
- Frequently Asked Questions
Last Updated: September 11, 2026
Why Your Sneakers Feel Loose (and What You Can Do)
A sneaker that fits perfectly in the store can feel completely different three months later, because foot volume changes throughout the day and shoe materials stretch with wear, which is why so many people search for ways to fix loose sneakers.
Foot volume is the three-dimensional space your foot occupies inside a shoe. When it decreases (weight loss, reduced swelling, or breaking in a shoe), the upper no longer holds your foot securely.
Solutions fall into two categories: temporary adjustments and permanent fixes. Below are seven approaches, ranked from quickest to most durable.
Quick Fixes to Tighten Loose Sneakers
The fastest way to fix loose sneakers is to add thickness inside the shoe or change how the laces pull the upper against your foot.
Try Thicker Socks First
Before spending money on inserts or grips, swap your socks. A medium-weight athletic sock adds meaningful volume in the heel and instep, the most common mistake is assuming the shoe is the problem when sock choice changed between seasons (aaos.org). Cushioned running socks work best; dress socks or thin no-shows won't move the needle.
Adjust Your Lacing Technique
Lacing is the most underused fit adjustment available. Most people lace straight across through every eyelet, which prevents tightening specific zones.
The runner's loop (also called a heel lock) is the most effective pattern for heel slippage. Here's how to do it:
- Lace your shoes normally up to the second-to-last eyelet
- Thread each lace end back through the top eyelet on the same side, creating a small loop
- Cross the lace ends and thread them through the opposite loops
- Pull tight and tie normally
This creates a pulley effect that pulls your heel back into the heel counter. According to American Academy of Orthopaedic Surgeons guidance on shoe fit, proper lacing can address many common fit complaints without any additional products.
How to Stop Heel Slippage with Grips and Pads
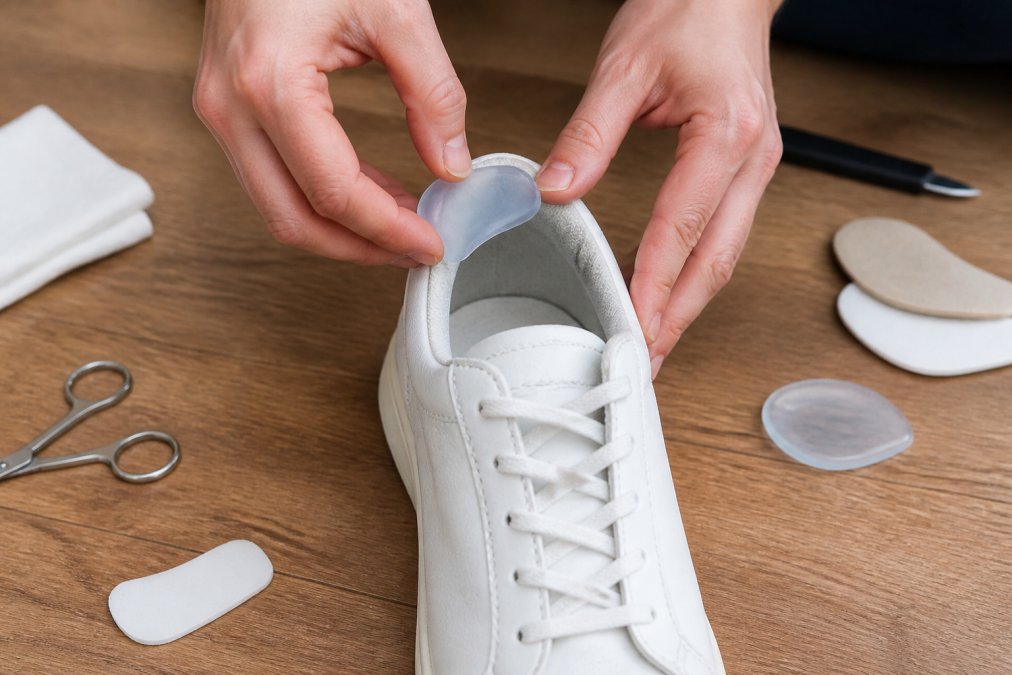
Heel slippage is the most common loose-sneaker complaint, and it has a specific cause: the heel counter (the rigid cup at the back of the shoe) isn't making contact with your heel, so your foot lifts with every step. Grips and pads close that gap, but only if you match the product to the direction your foot moves.
Diagnose the Direction of Slippage First
Before buying anything, walk a few steps and notice how your foot moves inside the shoe:
- Vertical lift (heel rises up and down) → heel counter gap. Fix with heel grips or a heel lock lacing pattern.
- Forward slide (foot pushes toward the toe box) → excess length or a low-volume instep. Fix with tongue pads, a thicker insole, or a toe cushion.
- Lateral roll (foot shifts side to side) → the shoe is too wide. Fix with a wider insole or a heel grip that wraps the sides of the counter.
Most people have a combination, so treat the dominant direction first, then layer a second fix.
Heel Grips and Heel Liners
Heel grips are adhesive pads that stick to the inside back of the shoe. Material matters more than brand:
- Foam, best for mild slippage (roughly a quarter-inch gap). Compresses over time and typically needs replacing every few months.
- Gel, handles larger gaps and stays put longer, but can feel squishy under a thin sock.
- Suede-backed or leather-backed, the thinnest option, used mainly to add friction rather than volume. Good for dressier sneakers where you don't want a visible bump.
Installation takes about 30 seconds per shoe: peel the backing, press the grip into the heel counter, and let it set. Two mistakes are common: placing the grip too high (pushes your foot forward and creates toe pressure) and stacking grips on top of each other (two thin grips slide against each other and peel off, use one grip sized to the gap). If the grip keeps peeling, clean the heel counter with rubbing alcohol and let it dry completely; adhesive won't bond to sock lint or foot powder residue.
Tongue Pads for Instep Support
A tongue pad adheres to the underside of the shoe's tongue and fills space between the tongue and your instep. It's the right fix when your foot slides forward rather than up and down, because it presses the top of the shoe onto your foot.
Tongue pads work especially well for low insteps or flat feet, where the upper doesn't contact the top of the foot. They're thin (3 to 6 millimeters) and nearly invisible. A few notes:
- Placement matters. Center the pad on the tongue, roughly where the top of your foot meets the shoe. Too low and it does nothing; too high and it presses on your ankle.
- Thickness is a dial, not a switch. Start thin; if it's not enough, add a second thin pad rather than switching to a thick one.
- They pair well with heel grips. If your foot both lifts and slides forward, a heel grip plus a tongue pad often solves both problems at once.
When Grips and Pads Aren't Enough
If a correctly placed heel grip and tongue pad still leave your heel lifting, the problem is usually one of three things:
- The shoe is more than a half-size too long. No insert closes that much gap without crowding your toes.
- The heel counter has collapsed. Once the internal stiffener breaks down, no pad restores the structure, repair or replace.
- The laces can't hold tension. If your laces stretch or slip, the upper never stays pulled back against your heel. A heel lock lacing pattern or elastic laces with consistent tension does more than any pad.
Best Insoles for Loose Shoes
The best insoles for loose shoes add volume without crowding your toes. A thick, cushioned insole can take up a full half-size of internal space, often exactly what a loose sneaker needs. Look for:
- Moderate thickness (5-10 mm) to fill volume without pushing your foot up into the laces
- Arch support to keep your foot centered and prevent lateral sliding
- Trim-to-fit sizing to match the insole to your shoe's actual footbed
Memory foam and polyurethane work better than gel for volume reduction because they hold their shape under compression; gel compresses too easily and stops filling the gap.
Toe Cushions for Sliding
Toe cushions are small pads placed at the front of the shoe to stop your foot sliding forward, useful if your feet slide toward the toe box during walking or running, causing blisters and toenail pressure. Most are made from felt or foam and adhere to the underside of the shoe's upper. Replace them every few months, as they compress with use. keep activewear in place.
No-Tie Elastic Shoelaces: A Permanent Fix for Loose Sneakers
If thicker socks, relacing, and inserts still leave your sneakers loose, the laces themselves are likely the problem. Traditional laces stretch, lose friction, and can't maintain consistent tension. No-tie elastic shoelaces maintain constant, adjustable tension without knots, flexing with your foot's movement and returning to their original tension so the fit stays consistent all day.
uLace has made elastic no-tie laces since 2009, built with the right stretch to hold your foot securely. Installation takes about two minutes with a push-and-pull method. See the full range at uLace Classic no-tie shoelaces, starting at $6.49 in a wide variety of styles and colors.

If you're active or play sports, the uLace ProFormance line uses a higher-tension elastic designed for running and court sports. It's the same slip-on convenience with more lockdown for high-impact movement.

Material-Specific Fixes: Leather vs. Mesh vs. Canvas
Most loose-sneaker guides treat every shoe the same, which is why so many people ruin leather sneakers with a canvas fix. Material determines which fixes are safe, risky, or useless.
| Material | Why It Loosens | Best Fixes | Avoid |
|---|---|---|---|
| Leather | Fibers stretch with wear and moisture; the upper molds to your foot over time | Heel grips, tongue pads, thicker socks, controlled leather shrinkage | Machine washing, dryers, direct high heat |
| Mesh | The knit or woven upper loses structure as fibers relax; the shoe gets wider, not longer | Insoles, elastic laces, thicker socks, tongue pads | Any shrinking method |
| Canvas | Fabric stretches along the weave; there's no internal structure to hold shape | Insoles, elastic laces, tongue pads, heel grips | Heat-based shrinking |
| Synthetic (PU, TPU, knit blends) | Varies widely, some hold shape, some relax like mesh | Insoles and laces are safe; test small fixes first | Heat, solvents, anything that could melt or discolor the upper |
Why Leather Is the Only Material You Can Realistically Shrink
Leather is a network of collagen fibers. When they absorb moisture they swell; as they dry they contract, and if the leather stays under tension while drying, it ends up slightly smaller. That's the mechanism behind leather shrinkage, and why it fails on everything else.
Mesh and canvas lack that fiber structure. Wetting and drying them under tension either does nothing or permanently distorts the shape. No version of this trick works on a mesh runner.
Shrinking Leather Sneakers Safely
If you have leather sneakers that are slightly too large, a controlled shrink can take up a small amount of volume, think a few millimeters, not a half size. The method:
- Dampen the leather evenly with a barely-wet cloth. You want it cool and slightly darkened, not soaked.
- Put on thick socks and wear the shoes for 15 to 30 minutes so the leather molds to your foot.
- Apply gentle warmth with a hair dryer on low, held at least 12 inches away, moving constantly. Stop as soon as the leather feels dry to the touch.
- Let the shoes cool and finish drying at room temperature, still on your feet or on shoe trees, so they hold the new shape.
This works because leather fibers contract as they dry. The risk is overdoing it: too much heat cracks the finish, and too much moisture warps the shape or leaves water stains. Do one shoe at a time before committing the second.
What Actually Works on Mesh and Canvas
Since shrinking isn't an option, fix a loose mesh or canvas sneaker by adding volume or tension:
- Insoles are the highest-leverage fix. A 5 to 10 millimeter insole takes up meaningful internal space without crowding the toe box, and it works the same on mesh and canvas.
- Elastic laces matter more on mesh than on leather, because a mesh upper has less structure to hold tension on its own. Laces that maintain constant tension keep the upper pulled against your foot even as the mesh relaxes.
- Tongue pads and heel grips work on both, but adhesion is trickier on mesh, the textured surface needs a clean, dry bond, and some grips peel faster than on leather or canvas.
- Thicker socks are the zero-cost test. If a medium-weight athletic sock fixes the fit, the problem is volume, not structure.
A Quick Material Test Before You Buy
If you're not sure what your sneaker's upper is made of, check the inside tongue tag. If it says "leather" or "full-grain leather," the shrink method is on the table. If it says "mesh," "knit," "textile," or "canvas," skip shrinking and go straight to insoles and laces. If it says "synthetic" or "PU," treat it like mesh, add volume, don't try to shrink.
DIY vs. Professional Repair: When to Seek Help
Most loose sneaker problems are solvable at home for under $20, but some situations call for a professional.
Try DIY first if:
- The shoe fits well everywhere except the heel or instep
- The looseness developed gradually over months of wear
- You haven't tried lacing adjustments or inserts yet
See a professional if:
- The shoe is more than a half-size too large (no insert will fix this)
- The heel counter has collapsed or the sole is separating
- You have foot pain, numbness, or recurring blisters despite adjustments
- You need a custom orthotic for a diagnosed foot condition
A podiatric evaluation is worth considering if fit problems persist across multiple pairs of shoes. According to Cleveland Clinic information on foot health and footwear, persistent shoe fit issues can indicate underlying foot structure changes that benefit from professional assessment.
For sneaker repair specifically, a good cobbler can replace heel counters, restitch uppers, and rebuild worn footbeds. Get a quote before committing.
Loose sneakers are frustrating but rarely a lost cause. The right combination of insoles, heel grips, and lacing adjustments solves most fit problems in minutes. For a permanent fix that eliminates daily retying, uLace offers elastic no-tie laces designed to hold your foot securely all day, with easy installation, many colors, and options for casual wear and high-impact sports. Take the uLace quiz to find the right laces for your sneakers and stop fighting with loose shoes for good.
Frequently Asked Questions
How can I make my loose shoes feel tighter without buying new ones?
You can tighten loose sneakers with a few low-cost adjustments. Start by swapping to thicker socks, which adds volume inside the shoe. Add a cushioned insole to lift your foot and reduce extra space. Heel grips stick to the back of the shoe to stop slippage. For a permanent fix, replace standard laces with no-tie elastic shoelaces that keep constant tension across the instep. These changes cost far less than new sneakers and take minutes to set up.
What are the best insoles for loose shoes?
Look for insoles with a cushioned base and arch support, which fill excess volume and hold your foot in place. Flat foam insoles work for minor looseness, while gel or memory foam options add more volume for wider shoes. If you have a high arch or need extra stability, try an orthotic-style insole. Trim the insole to match your shoe's original footbed shape for the best fit. Replace insoles every six to twelve months as cushioning compresses over time.
Can you shrink sneakers to make them fit better?
You can shrink leather sneakers slightly by applying heat, such as with a hair dryer, then wearing them with thick socks until they cool. This works because leather contracts as it dries. Mesh and canvas sneakers do not respond well to shrinking and may warp or crack. For most loose sneakers, adding insoles, heel grips, or no-tie elastic shoelaces is safer and more reliable than trying to shrink the shoe itself.
Why do my shoes slip off when I walk?
Heel slippage happens when there is too much space between your heel and the back of the shoe, often caused by a loose lacing technique or a shoe that is half a size too large. A runner's loop lacing pattern locks the heel down. Heel grips add friction and padding. If the shoe is simply too big, a thicker insole or no-tie elastic shoelaces can take up the slack. Persistent slippage can lead to blisters, so address it early.