




How to Install Elastic Shoelaces: A Step-by-Step Guide
Table of Contents
- What You'll Need Before Installing Elastic Shoelaces
- How to Install Elastic Shoelaces: Step-by-Step Process
- How to Trim Elastic Shoelaces for the Perfect Fit
- Best Practices for Elastic Lace Tension
- How to Adjust Elastic Laces for Running and Performance
- Common Installation Mistakes to Avoid
- Removal and Re-Installation: When You Need to Change Your Laces
- Frequently Asked Questions
Last Updated: September 28, 2026
What You'll Need Before Installing Elastic Shoelaces
Getting ready to transform your sneakers into slip-ons takes just a few simple items. Most of what you need is already at home.
Here's what to gather before you start:
- Your sneakers (any style works)
- A pair of elastic shoelaces like uLace
- Small scissors or a sharp knife for trimming
- A flat surface to work on
- Optional: a ruler or measuring tape for precision
That's it. No special tools required. The beauty of elastic laces is their simplicity. According to uLace installation guides, most people have everything they need in their homes already.

Elastic laces come ready to use straight from the package. You don't need to buy anything extra or prep the laces beforehand. This one-time setup is what makes elastic laces so convenient for busy families, seniors, and anyone who wants to skip the daily tying routine.
How to Install Elastic Shoelaces: Step-by-Step Process
Installing elastic laces takes about five minutes per shoe, a one-time investment that pays off daily.
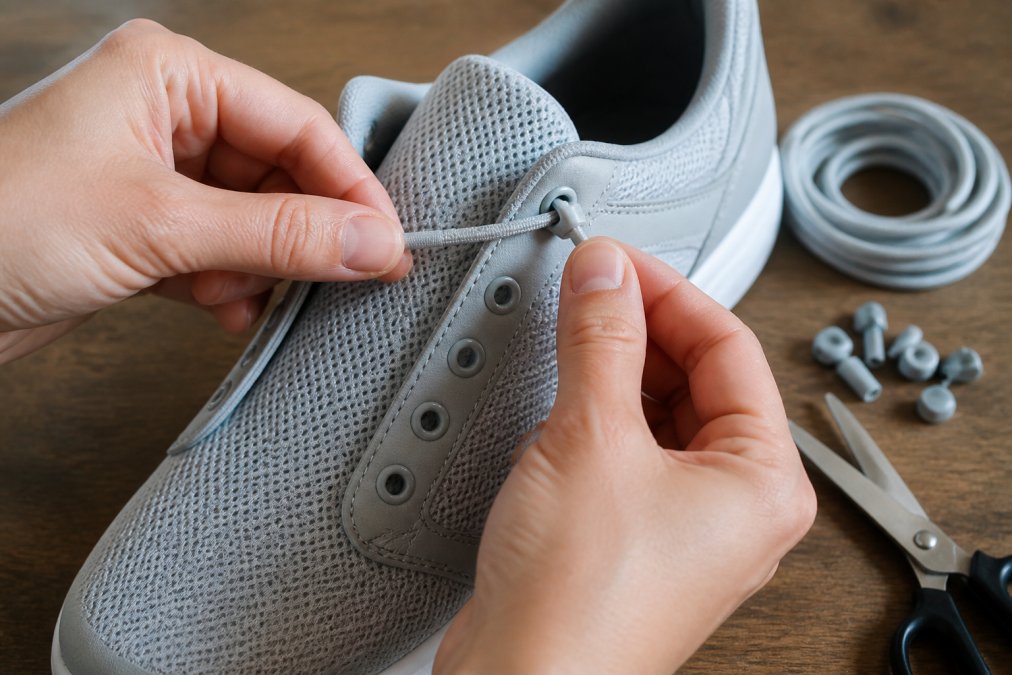
Step 1: Remove Your Existing Laces
Remove your old laces completely by pulling them through each eyelet from top to bottom. Your shoe is now ready for the elastic system.
Step 2: Thread the Elastic Laces Through the Eyelets
This is the main part of the installation. Take your elastic laces and start at the top eyelet, just like you would with regular laces.
Pull the elastic cord through each eyelet going down. Keep the tension snug but not overly tight. The cord should move smoothly through without pinching or bunching. According to Lace Bread's elastic lace comparison, proper threading tension is essential for comfort and durability.

Work your way down the shoe, making sure the lace sits flat in each eyelet. The elasticity will naturally create some give, so you don't need to force it tight. When you reach the bottom eyelet, pull the cord through and prepare for the next step.
Step 3: Attach the Cord Lock and Locking Mechanism
The locking mechanism is what keeps your elastic laces secure. This small device prevents the cord from slipping or loosening during wear.
Slide the cord lock onto the elastic cord at the bottom of the shoe. Position it so the cord is snug but can still stretch slightly. The lock should sit comfortably against the shoe without digging into your foot. Based on Runner's World guidance on elastic lace systems, a properly positioned cord lock prevents foot fatigue during extended wear.
Secure the lock in place by tightening it according to your specific lace system's instructions. Most locking mechanisms use a simple push-and-pull design that takes seconds to secure.
Step 4: Trim Excess Length
Trim excess cord, leaving about a half-inch beyond the lock for safety. Cut carefully with sharp scissors. Optionally seal the cut edge with clear nail polish or fabric glue to prevent fraying.
How to Trim Elastic Shoelaces for the Perfect Fit
Measure twice before cutting. Leave about a half-inch of cord past your cord lock, enough for safety without bulk. Test the fit before trimming if possible by putting your shoe on and checking the elasticity. You can always trim more later, but you can't add cord back once it's cut.
Best Practices for Elastic Lace Tension
Optimal tension varies based on shoe type, foot shape, activity level, and individual mobility needs. Get it right and your shoes feel like custom slip-ons; get it wrong and they feel loose or uncomfortably tight.
Finding Your Baseline Tension
Use the one-finger test: fit one finger between the lace and your foot at the tightest point for compression without restricting circulation. Thread the cord snugly, then put the shoe on and walk for 2-3 minutes. If your foot slides forward, tension is too loose. If you feel numbness or tingling, it's too tight. Adjust the cord lock position and test again.
Tension by Shoe Type
Running shoes: Require firm, consistent tension. Position the cord lock lower on the shoe to anchor the heel firmly during push-off. Tension should feel snug enough that your foot doesn't shift when jogging, but not so tight that your toes feel numb after 15 minutes.
Casual sneakers and everyday wear: Can tolerate looser tension. Position the cord lock in the middle of the shoe for balanced security.
Basketball and court shoes: Demand snug ankle support. Tension should be firm around the ankle and midfoot, with slightly more give at the toe box. Test by performing lateral shuffles, if your ankle feels stable, tension is correct.
Boots and work shoes: Start with moderate tension and increase gradually if you notice heel movement during uneven terrain walking.
Tension Adjustments for Foot Shape and Conditions
Wide feet: Thread slightly looser through middle eyelets while keeping tension firm at heel and toe box. Narrow feet: Use slightly tighter overall tension to prevent side-to-side movement. High arches: Keep tension firm in the midfoot but looser at the toe box. Flat feet: Use consistent, moderate tension throughout. Arthritis or joint sensitivity: Use slightly looser tension that doesn't compress joints; prioritize comfort over maximum tightness.
Seasonal and Activity-Based Adjustments
Thicker socks require slightly looser tension than thin socks. Feet swell during the day and in warm weather, so morning tension may feel tight by evening. Adjust tension based on planned activity, tighter for running, looser for casual wear.
Monitoring Tension Over Time
Check tension every 2-3 weeks using the one-finger test. If shoes feel looser, adjust the cord lock position forward to increase tension without re-threading.
How to Adjust Elastic Laces for Running and Performance
For running, tension should be firm but not painful. Position the cord lock lower on the shoe for better heel security during push-off. Test your setup by doing light jogs or jumping movements. Test during a short workout before committing to serious athletic activity.
Common Installation Mistakes to Avoid
Most people make the same mistakes when installing elastic laces. Knowing what to avoid saves you frustration and prevents having to re-do the installation.
Threading too loose. This is the number one error. People worry about making the lace too tight and end up threading it loosely. Loose threading means the lace can shift and slip, defeating the whole purpose. According to Triathlete Magazine's elastic lace analysis, installation errors are common but easily preventable with proper technique.
Trimming too much cord. Cut too aggressively and you won't have enough cord to stay in the lock. You'll end up with laces that slip out during wear. Trim conservatively. You can always cut more later if needed.
Ignoring the eyelet pattern. Follow the original lacing pattern of your shoe. Don't try to create your own pattern. Shoe designers engineered the eyelet placement for proper support and fit. Deviating from it causes discomfort and instability.
Skipping the tension test. Don't just install the laces and assume they're perfect. Put your shoes on and actually wear them for a few minutes.
Removal and Re-Installation: When You Need to Change Your Laces
Removing and reinstalling elastic laces is straightforward, but the process reveals why elastic laces are transformative for people with mobility challenges, arthritis, and other adaptive dressing needs.
Basic Removal Process
Loosen the cord lock and pull the elastic cord back through each eyelet from bottom to top. Inspect the cord and eyelets for damage. You can reinstall the same laces in the same shoe, move them to a different pair, or replace them with a different style.
Why Removal and Re-Installation Matters for Accessibility
Elastic laces are not just a convenience feature, they are an adaptive solution for people who struggle with traditional lacing due to arthritis, limited hand strength, reduced dexterity, or mobility conditions.
Practical Removal and Re-Installation Scenarios
Scenario 1: Moving laces to a new shoe. If you buy a new pair of sneakers and want to keep your elastic laces, removal and reinstallation takes about 10 minutes total. This extends the value of your elastic laces across multiple shoes over time. For people on fixed incomes or those who prefer sustainability, this reusability is significant.
Preventing Damage During Removal
The main risk during removal is damaging the shoe eyelets if you pull too aggressively. Eyelets on canvas sneakers can tear, and metal eyelets can bend if you yank the cord. To prevent damage, loosen the cord lock fully before pulling the cord. Pull gently and steadily, allowing the cord to slide through each eyelet without resistance.
Quality and Durability Across Multiple Installations
This reusability makes elastic laces a smart investment for people with multiple shoes or changing footwear needs.
Frequently Asked Questions
How long does it take to install elastic shoelaces?
Most elastic shoelaces install in under five minutes with a one-time setup. Whether you're using uLace Shorts, uLace Classic, or uLace ProFormance, the installation process is straightforward and requires no special tools. Once installed, you'll enjoy slip-on convenience without ever needing to tie your shoes again.
How do I adjust elastic laces for running and athletic performance?
When adjusting elastic laces for running, tension is key. Pull the elastic cord snug but not overly tight to prevent pinching and ensure adequate foot support. The laces should feel secure around your ankle without restricting blood flow. For athletic activities, test the fit by walking or jogging a few steps before heading out. You can fine-tune the tension by loosening or tightening the cord lock until you achieve the perfect balance between comfort and security.
Will elastic shoelaces work with my specific shoe type?
Elastic shoelaces work with most sneaker styles, including wide-width shoes. The elasticity allows them to stretch for easier entry and exit while maintaining a secure fit. However, compatibility depends on your shoe's eyelet pattern and construction. Standard laced sneakers adapt well to elastic laces. If you have concerns about fit, uLace offers different styles like uLace Shorts and uLace Classic to match various shoe designs and widths.
What makes uLace different from other elastic lace brands?
uLace has been the original creator of no-tie elastic shoelaces since 2009, offering a proven track record of quality and innovation. Our elastic laces transform standard sneakers into slip-on footwear through a simple push-and-pull installation method. With a wide variety of styles and colors, competitive pricing starting at $5.99, and fast shipping from the USA, uLace combines affordability with durability and design.