




How to Replace Standard Laces with Elastic Alternatives
Table of Contents
- Why Swap Standard Laces for Elastic Alternatives
- How to Install Elastic Shoelaces: A Step-by-Step Guide
- How to Adjust Elastic Shoelaces for a Secure Fit
- What to Do When Elastic Shoelaces Are Too Long
- Best No-Tie Shoelaces for Seniors and Accessibility Needs
- Choosing the Right Elastic Alternatives for Your Shoes
- Common Mistakes to Avoid and Troubleshooting Tips
- Conclusion: Enjoy the Convenience of Slip-On Sneakers
- Frequently Asked Questions
Last Updated: October 14, 2026
Why Swap Standard Laces for Elastic Alternatives
Standard shoelaces come untied, drag through puddles, and force you to bend down every time you leave the house. Elastic alternatives solve all three problems at once by turning any lace-up sneaker into a slip-on you never have to tie.
At uLace, we have been making no-tie laces since 2009, and the reason customers keep coming back is simple: they get to keep the sneakers they love without the daily hassle. Elastic laces stretch as your foot slides in, then hold firm once you are wearing the shoe.

Here is what changes when you make the swap:
- No more bending over to tie or re-tie
- No dangling lace ends to trip on or drag through dirt
- No more forcing your foot in and crushing the heel counter
The trade-off is real, though. Elastic laces are not ideal for every activity, and Triathlete's guidance on when elastic laces make sense notes there are cases where they should not be used.
How to Install Elastic Shoelaces: A Step-by-Step Guide
Installing elastic shoelaces takes about five minutes per shoe and requires no tools. You remove the old laces, thread the new elastic ones through the eyelets, and secure the ends.
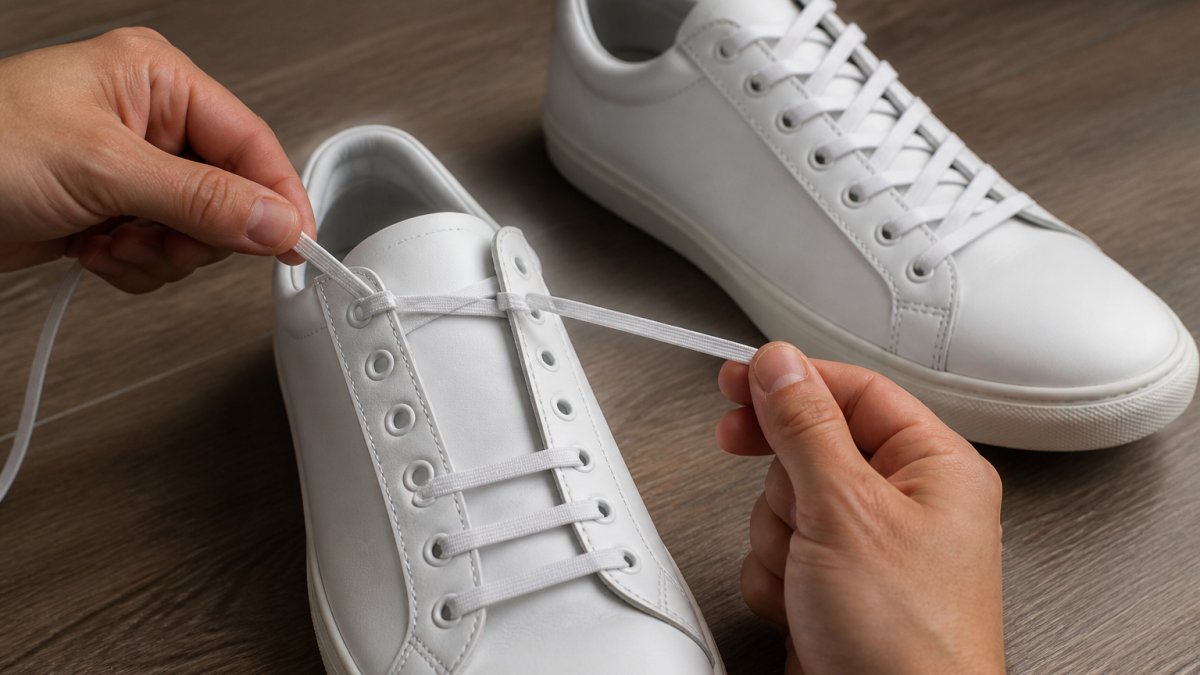
Here is the full walkthrough, including the sizing check most guides skip.
Step 0: Measure Before You Buy
Elastic laces are sold by length, and the length you need depends on your eyelet count, not your shoe size. Count the eyelet pairs on one side of the shoe (a standard sneaker has 5 to 7). As a working rule, allow roughly 3 to 4 inches of lace per eyelet pair, then add about 6 inches of tail for the finishing tuck.
Step 1: Remove Your Old Laces
Pull the standard laces out of every eyelet, working from the top down. Check the eyelets for sharp edges or burrs that could snag the new elastic, run a fingernail around the inside of each one. Wipe the shoe clean if the old laces left behind dirt, and let the shoe air out for a few minutes so trapped grit does not grind into the new lace.
Step 2: Choose Your Threading Pattern
The pattern you pick changes how pressure is distributed across the top of your foot. Three patterns cover almost every situation:
- Crisscross (standard): The lace crosses over itself between each eyelet pair. This is the most secure pattern and the best default for running and walking. It distributes tension evenly and resists side-to-side shifting.
- Straight bar (parallel): The lace runs straight across the top and passes vertically up the sides. This reduces pressure on the instep, which helps if you have a high arch or a sensitive top-of-foot. It is slightly less secure for hard lateral movement.
- Over-under (gap lacing): You skip the eyelet pair directly over a hot spot, then resume the crisscross above it. Use this to relieve pressure on a single tender point without loosening the whole shoe.
For most people, start with crisscross. Switch to straight bar only if you feel pressure across the instep, and use over-under only to target a specific hot spot.
Step 3: Thread the First Elastic Lace
Start at the bottom eyelet pair and work upward. Feed the lace through the bottom two eyelets from the outside in, so the lace ends sit on the inside of the tongue. Keep the two sides even as you climb, if one side is longer than the other at the top, your tension will be lopsided. Pull each segment snug but not tight as you go; the elastic should sit flat against the tongue with no twists.
Step 4: Secure the Lace Ends
Once the lace reaches the top eyelet, tuck the end under the last row of lace or use the lace tag included with your set. No knot is needed, the elastic holds itself in place.
uLace uses a simple push-and-pull install method, so you do not need to learn a new lacing pattern.
How to Adjust Elastic Shoelaces for a Secure Fit
Adjusting elastic shoelaces comes down to one thing: tension. Too loose and your heel slips. Too tight and the shoe pinches across the top of your foot.
Here is how to dial it in:
- Slide your foot into the shoe with the laces relaxed.
- Pull the lace ends gently until you feel light resistance.
- Walk ten steps and check for heel lift.
- Tighten or loosen one eyelet at a time until the fit feels right.
A good rule of thumb: you should be able to slide one finger under the laces at the widest part of your foot. If you cannot, loosen them a notch.
What to Do When Elastic Shoelaces Are Too Long
Elastic shoelaces that are too long can be trimmed, tucked, or swapped for a shorter set. The right fix depends on how much excess you have.
If you have less than an inch of extra lace, tuck the end under the last row of lacing.
If you have more than an inch, you have two options:
- Trim and re-secure: Cut the lace, leaving about half an inch past the final eyelet, then melt the cut end with a lighter to stop fraying.
- Switch to a shorter lace: uLace Shorts are cut for low-profile shoes and shorter lacing runs, so there is no trimming needed.
Never leave long lace ends dangling. They catch on pedals, chair legs, and escalator edges.
uLace ProFormance - Performance No-tie Laces - Black →
Best No-Tie Shoelaces for Seniors and Accessibility Needs
No-tie laces help anyone who struggles with bending, gripping, or fine motor control.
One uLace customer put it plainly: "I'm 72 and it's hard for me to bend over all the time to tie my shoelaces.
That is the whole point. You put the shoe on, your foot slides in, and you go. No knot, no bending, no help needed.
For anyone with hand or wrist issues, look for laces that:
- Install without tying or threading small knots
- Stay put once set, so you are not re-adjusting all day
- Come in colors that match the shoe, so they look intentional
Choosing the Right Elastic Alternatives for Your Shoes
The right elastic alternative depends on your shoe style, your activity level, and how much stretch you want. Before you pick a color, pick a category, the lace construction matters more than the look.
Match the Lace Type to the Shoe
- Flat elastic laces: The closest match to a standard flat lace. They sit wide against the tongue, distribute pressure well, and suit everyday sneakers, canvas shoes, and casual walkers. Best default for most people.
- Slim or round elastic laces: Narrower profile, less visual bulk. They suit low-profile shoes, minimalist sneakers, and dress-casual styles where a wide lace looks out of place. They distribute slightly less pressure, so they are a better fit for lighter shoes.
- Performance elastic laces: Built with a firmer stretch and a more secure anchor system for running, training, and court sports. They resist stretch loss under repeated load better than casual laces.
Understand Stretch and Tension
Elastic laces are not all equally stretchy. A softer stretch is easier to slide into but can feel loose during activity; a firmer stretch holds the foot more securely but takes more effort to put on. If you wear the same shoes for both errands and light exercise, a medium-stretch flat lace is the safest compromise. If you run or play a sport, choose a firmer performance lace and accept that the shoe will feel snugger to pull on.
Check Compatibility With Your Eyelets
Not every shoe takes every lace. A few things to confirm before buying:
- Eyelet count: Count the pairs on one side. More eyelets need more length.
- Eyelet type: Metal eyelets with smooth rims work with any lace. Plastic or fabric eyelets can fray thin elastic over time, so inspect them first.
- Lace width: A wide flat lace will not fit through a narrow eyelet. Measure the opening if you are unsure.
A Quick Comparison
| Option | Price | Best For | Style |
|---|---|---|---|
| uLace Classic | $6.49 | Everyday sneakers | Flat, classic look |
| uLace Slims | $5.99 | Low-profile shoes | Slim, minimal |
| uLace Shorts | $12.99 | Short lacing runs | Trimmed length |
| uLace ProFormance | $14.99 | Sports and active wear | Performance build |
For most people, uLace Classic in black or white covers daily wear at a low cost. If you want a pop of color, uLace Slims in Rainbow adds personality.

Lower Extremity Review's overview of shoe closure systems explains that no-tie options range from Velcro to elastic systems to clutch reel technology. Elastic sits in the sweet spot: simple, affordable, and easy to swap in yourself.
Common Mistakes to Avoid and Troubleshooting Tips
Most problems with elastic laces come from three mistakes: uneven tension, wrong lace length, and skipping the final tuck. Fix those and the laces do their job.
Watch for these:
- Uneven tension: One side tight, one side loose. Fix by re-threading from the bottom.
- Laces too long: Trim and melt the ends, or switch to a shorter set.
- Laces too loose: Re-tension at the bottom eyelets first.
For runners and athletes, PubMed research on running mechanics and shoe closure has examined how laced shoe conditions affect comfort and rearfoot motion. If you play a sport with hard cuts or sudden stops, test your setup during practice before relying on it in a game.
Conclusion: Enjoy the Convenience of Slip-On Sneakers
Swapping standard laces for elastic alternatives is one of the cheapest upgrades you can make to your daily routine.
If you are tired of bending over, tripping on loose ends, or watching your kid struggle with knots, uLace has a set for you.
Take the uLace quiz to find the right lace for your shoes, and turn the sneakers you already love into slip-ons you will never want to take off.
Frequently Asked Questions
How do I know what length elastic shoelaces to buy?
Measure your old laces from tip to tip. If you no longer have them, count the eyelet pairs on your shoe. If you prefer a custom fit, you can cut excess length after installing. Always check the product page for specific sizing guidance.
Can I use elastic laces on any type of sneaker?
Elastic laces work on most sneakers with standard eyelets, including athletic shoes, casual sneakers, and canvas shoes. They are not recommended for boots or dress shoes with unusually large or decorative eyelets. If your shoes have very wide or narrow spacing between eyelets, test one lace first to ensure it threads smoothly. uLace offers a quiz to help match the right style to your shoe type.
How tight should elastic shoelaces be?
They should be snug enough to keep your heel from slipping but loose enough to slide your foot in and out without using your hands. A good test: insert your foot, then try to pull the shoe off without untying. If it comes off easily, tighten the lace by pulling more through the anchor. If your foot feels pinched, loosen it. Elastic laces naturally stretch as you move, so start slightly looser than you think you need.
Will elastic laces stay secure during sports or running?
Yes, when installed and adjusted correctly. Elastic laces are designed to maintain tension during movement, and the anchor or lock keeps the lace from slipping. For high-impact activities, choose a performance style like uLace ProFormance, which is made for active use. Many athletes use elastic laces in triathlons and training. Just make sure the lace is threaded through all eyelets and the ends are securely fastened.