




Ways to Lace Shoes Without Tying: 7 No-Tie Methods
Table of Contents
- Straight Bar Lacing: The Cleanest No-Tie Look
- Ladder Lacing for Stability and Midfoot Support
- The Benefits of No-Tie Shoelaces for Daily Wear
- How to Install Elastic Laces on Any Sneaker
- Elastic Shoelace Length Guide: Finding the Right Fit
- Matching No-Tie Lacing Methods to Your Shoe Type
- Common Mistakes When Lacing Without Tying
- Conclusion
- Frequently Asked Questions
Last Updated: September 18, 2026
Straight Bar Lacing: The Cleanest No-Tie Look
Straight bar lacing is one of the most popular ways to lace shoes without tying because it creates a clean, horizontal pattern across the top of the shoe, and it's among the simplest ways to lace shoes without tying. At uLace, we've helped thousands of customers convert their favorite sneakers into slip-ons, and straight bar lacing remains the top choice for a tidy look.
The method works by running the lace straight across each pair of eyelets instead of crisscrossing. You start at the bottom, thread one end through, and work your way up in horizontal lines.
Here's how to do it:
- Thread the lace through the bottom two eyelets, going straight across
- Take the left end and run it up the left side, skipping one eyelet
- Cross over to the right side and thread through the next open eyelet
- Repeat this pattern until you reach the top
- Tuck the lace ends under the tongue or into the shoe
This pattern works well with both flat and round laces. It also reduces bulk on top of the foot, which helps if you have high arches or sensitive feet.
How to Create a Hidden Knot for a Tieless Finish
A hidden knot lets you lock the lace in place without a visible bow. The trick is to tie a small knot at the bottom of the lacing and tuck it behind the tongue.
Here's the process:
- Lace your shoes with any pattern you like
- Pull both lace ends to the bottom of the shoe
- Tie a tight double knot underneath the bottom eyelets
- Tuck the knot and loose ends under the insole or behind the tongue
This gives you a secure fit with nothing showing on top. It works best with flat laces that stay put. Elastic laces make this even easier because they stretch when you put the shoe on and hold firm once your foot is in.
Ladder Lacing for Stability and Midfoot Support
Ladder lacing is a go-to method for anyone who needs extra support across the midfoot. Unlike crisscross patterns, ladder lacing runs straight across the top and connects vertically along the sides, creating a ladder shape.
This pattern shines for people with high arches or those who need firm tension adjustment.
To create ladder lacing:
- Start with a straight bar across the bottom eyelets
- Run each end straight up the same side to the next eyelet
- Cross the laces over to the opposite side and thread through
- Keep alternating until you reach the top
- Adjust tension as you go for a comfort fit
The Benefits of No-Tie Shoelaces for Daily Wear
The benefits of no-tie shoelaces go well beyond convenience. For parents, seniors, and anyone with fine motor challenges, elastic laces remove a daily obstacle.
Here's what makes them worth switching to:
- Slip-on conversion turns any sneaker into an easy-on, easy-off shoe
- No bending required, which helps seniors and anyone with back or hip issues
- No dangling lace ends to trip on or drag through dirt
- Consistent tension every time you put your shoes on
- Neat appearance with no messy bows coming undone
- Less wear on the heel because you're not forcing your foot in
How to Install Elastic Laces on Any Sneaker
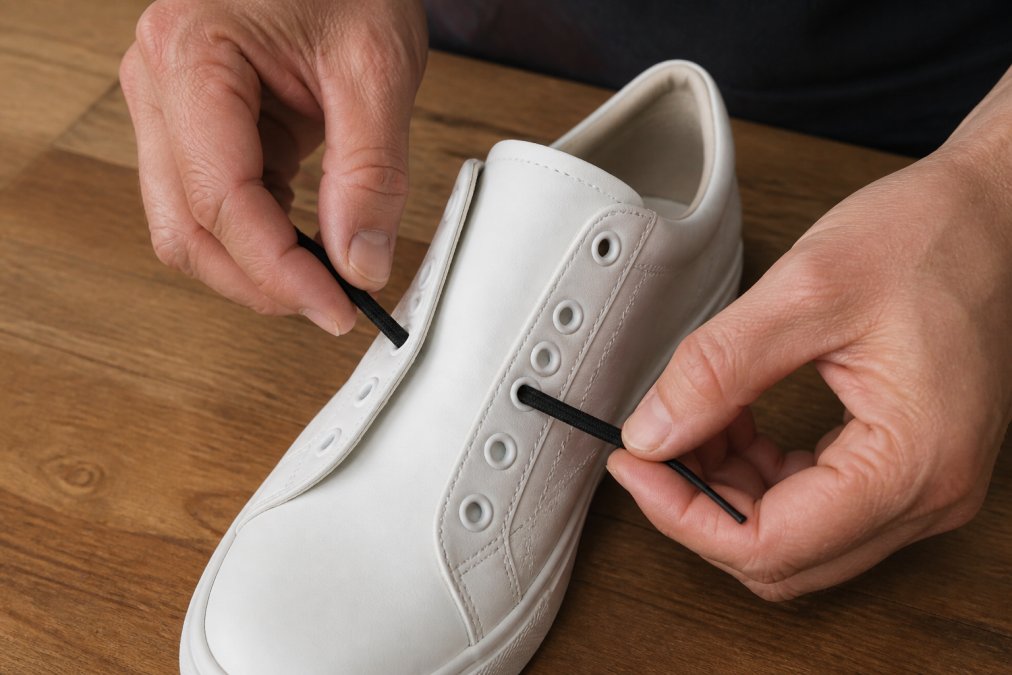
Installing elastic laces takes about five minutes per shoe and needs no tools. The uLace system uses a simple push-and-pull method that works on almost any sneaker with standard eyelets.
Step-by-Step Installation with uLace
uLace is the original creator of no-tie elastic shoelaces, and the install is built to be simple. Here's how it works:
- Remove old laces and clean the eyelets if needed
- Pick your pattern (straight bar, ladder, or crisscross)
- Thread the first lace end through the bottom eyelet
- Push the lace tip through until it clicks into the locking mechanism
- Repeat on the other side, working your way up
- Trim any excess and tuck the ends under the tongue
- Test the fit by sliding your foot in and out a few times
Elastic Shoelace Length Guide: Finding the Right Fit
Getting the right shoelace length matters more with elastic laces than with standard ones. Too short, and you can't complete the pattern. Too long, and the ends dangle or bunch up.
Here's a simple guide based on typical shoe sizes:
| Shoe Type | Recommended uLace Style | Typical Eyelet Count |
|---|---|---|
| Kids' sneakers | uLace Kiddos | 4-6 pairs |
| Low-top sneakers | uLace Classic | 5-7 pairs |
| High-tops | uLace Shorts | 7-9 pairs |
| Athletic/running | uLace ProFormance | 6-8 pairs |
Matching No-Tie Lacing Methods to Your Shoe Type
Not every lacing method suits every shoe. The right pick depends on eyelet count, eyelet hardware (standard holes vs. metal D-rings vs. fabric loops), upper material, and how you plan to use the shoes.

| Shoe Category | Best No-Tie Method | Eyelet Range | Why It Works | Watch Out For |
|---|---|---|---|---|
| Low-top canvas sneakers (e.g., classic canvas plimsolls) | Straight bar with hidden knot | 5-7 pairs | Flat, wide upper holds horizontal bars neatly; minimal bulk | |
| Running and athletic shoes | Ladder lacing with elastic laces | 6-8 pairs | Vertical side runs lock the midfoot; straight bars spread pressure | |
| High-tops (canvas or leather) | Crisscross with hidden knot under the tongue | 7-9 pairs | Crisscross keeps the ankle collar snug; hidden knot removes the bow | |
| Slip-on styles | Elastic laces, relaxed tension, straight bar | 3-5 pairs | Straight bar keeps the opening wide for easy entry | |
| Dress shoes (oxfords, derbies) | Straight bar with thin flat laces | 5-6 pairs | Horizontal bars read as formal; no visible bow | |
| Boots (work, hiking, casual) | Ladder lacing or crisscross with hidden knot | 7-10 pairs | Ladder distributes tension across a tall shaft; crisscross locks the ankle | |
| Kids' sneakers | Elastic laces, straight bar | 4-6 pairs | Fewer eyelets, simpler pattern, no bow to trip on |
How to Read the Matrix
Three variables drive the recommendation:
- Eyelet count. Under 5 pairs, keep the pattern simple, straight bar or a single crisscross. Over 7 pairs, you have room for ladder lacing or a hidden knot without running out of lace.
- Eyelet hardware.
- Upper material.
Sneaker Customization vs. Formal Looks
For a subtle finish, stick with straight bar and a lace color that matches the upper.
When the Matrix Doesn't Fit
Some shoes fall between categories, chukka boots with 5 eyelet pairs, or trail runners with reinforced eyelets and a wide toe box. In those cases, default to the method that matches your priority:
- Comfort first: ladder lacing with elastic laces
- Speed first: straight bar with elastic laces and a hidden knot
- Looks first: straight bar with flat laces
- Support first: crisscross with a hidden knot, tensioned at the ankle
Common Mistakes When Lacing Without Tying
Most problems with no-tie lacing come down to a few fixable mistakes. Here are the ones we see most often:
- Using the wrong lace length, which leaves the top eyelets empty
- Over-tightening, which causes foot pain and pressure points
- Skipping the hidden knot, so the lace works loose over time
- Forcing your foot in instead of letting elastic laces stretch
- Ignoring lace maintenance, like checking for fraying every few months
Conclusion
Getting dressed shouldn't be a daily struggle with tangled laces and loose bows. Whether you're a parent racing through the morning routine, a senior who wants to avoid bending over, or a sneaker fan looking for a cleaner look, the right lacing method changes everything.
Frequently Asked Questions
Are elastic no-tie laces worth it for everyday wear?
Yes, for many people. No-tie laces turn any sneaker into a slip-on, which saves time and removes the need to bend over. They also keep laces from dragging on the ground and getting dirty. For kids, seniors, or anyone with hand mobility challenges, they can make a real difference in daily routines. The main trade-off is that you cannot fine-tune tension as precisely as with traditional laces, but quality options like uLace provide a secure, stretchy fit that holds up all day.
Can you turn any sneaker into a slip-on shoe?
Most lace-up sneakers can be converted. The key is matching the lacing method to your shoe's eyelet count and shape. Flat sneakers with standard eyelets work best. For high arches or wide feet, you may need to adjust tension or choose a lacing pattern that distributes pressure evenly. uLace Classic and uLace Shorts are designed to fit a wide range of sneaker styles, and the installation takes just a few minutes with no tools required.
How do I know which elastic shoelace length to buy?
Elastic shoelace length depends on your shoe's eyelet count and the lacing pattern you choose. As a general guide, count the eyelet pairs on one side of your shoe. Fewer eyelets need shorter laces; more eyelets need longer ones. uLace offers different lengths. If you are between sizes, size up slightly for a more comfortable stretch and easier slip-on fit.
Will no-tie laces stay secure during sports or running?
It depends on the lacing system. Some elastic laces are designed for casual wear and may loosen during high-impact activity. For sports, look for performance-focused options like uLace ProFormance, which are built to maintain tension during movement. Lacing techniques like ladder lacing also add stability by locking the midfoot in place. Always test the fit with a short walk or jog before relying on them for intense activity.